Thanks for visiting!

Followers

Pages

Blogger

Ragi (Finger Millet) Breakfast Squares

Posted by Sanchitha Monday, August 1, 2011 0 comments

My sis-in-law sent me a couple of these healthy and delicious Ready to eat 'Ragi Huri Hittu'.
Huri-hiTTu is a kannada word, “huri” -roast and “hiTTu” -powder form of a grain.
Preparing this powder all by yourself can become a time-consuming process, as the entire process involves washing, draining and drying of Ragi (finger millet) and then slow pounding them.

We can make our life simple by buying these ready-to-eat pack which can be helpful during lazy mornings where you run out of time to prepare breakfast.


All you need is to take the desired portion of this powder in a bowl and add required quantity of milk and roll into balls. This pack already contains sugar and cashewnuts.

I just went a bit creative by cutting them into squares. 
An attractive food for fuzzy Toddlers and for all of you who are always on the RUN!!!

Healthy and Delicious breakfast in a minute or two!!!

Apple and Carrot soup with potatoes

Posted by Sanchitha Sunday, July 31, 2011 0 comments


I am a great fan of Tarla Dalal and especially love her book "Baby and Toddler cookbook". It is an interesting book with an impressive collection of recipes for babies and Toddlers.
I have been following these since my son was 6 months till now and have also been working on my own versions experimenting with different flavours and textures.

One of my son's favourite soup from this book as below:
This is a very filling soup and will not make the baby hungry for many hours. You can start to give this soup from 8 month onwards.
You will need:
Apple - 1/4 cup (peeled and chopped)
Carrot - 2 Tbsp (peeled and grated)
Potato - 1/4 cup (peeled and chopped)
Onion - 1 tbsp (optional)
oil - 1/2 tsp

1. Heat oil in a pressure cooker and saute the onions for 2 mins.
2. Add the apple, carrots and potato and saute for 2-3 mins
3. Add 1 cup of water and pressure cook for 2-3 whistles
4. Cool and puree in a liquidiser.
5. Strain and re-heat by simmering before serving.

You can also add a dash of salt and white pepper for flavour.

Rice with Spinach is an appealing meal for babies and toddlers because of its bright green colour and is nutritious too as spinach is high in Vitamin A and folic acid which is good for growing babies. You can serve this during lunch or dinner before sleep as this meal would keep the baby satiated for long hours.

Age group : 1 year and above


You will need:
Spinach (Palak) - 1 cup (chopped)
Par-boiled rice - 1/2 cup
Moong Dhal - 4 Tbsp
Jeera - 1 1/2 tbsp
Ghee
salt to taste

Method:
1) In a pan, heat ghee and crackle cumin seeds.
2) Add Spinach and fry until the raw smell disappears. Pour little water and allow to simmer.
3) Pressure cook rice and dhal together.
4) Then add the spinach gravy to mashed rice-dhal.
5) Serve topped with a teaspon of ghee.

Holiday cooking

Posted by Sanchitha Thursday, July 28, 2011 0 comments

Holiday cooking is the best time of the year! 


I like to cook in the open, fresh n green, plenty of natural light and where the air is pure.

This is from one of my favourite spot in a place called Bad Gastein in Austria.


One of the most beautiful places I have been to till now. 

The air so fresh and pure and the cool breeze just lifts your spirits up!!!


There is no restaurant/ cafe closeby and we shopped in the nearest supermarket for morning's breakfast...
Well, here is the breakfast table with whatever we had... voila!!! quite sumptuous one indeed!!!


1) Fruits : kiwi, apples

2) Stroopwafels (bought from our Holland trip!)

3) Potato scones

4) Croissant
5) Museli with milk


 6) Orange juice
All that is needed to kick start your metabolism!!!

Ahh now reminiscing these... badly need a holiday this year!!!

Mirchi Ka Salan

Posted by Sanchitha 0 comments


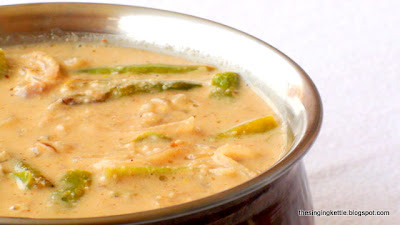
Except for the very authentic 'Hyderabadi Biriyani', I have never tried any of the other recipes from the Hyderabadi cuisine. This one is on to my favorite list one!!!
I saw this on TV and decided to try it out myself last weekend...

I never have liked the taste of peanuts before in a recipe... but peanuts along with the tangy tamarind flavor has given it a whole new dimension to this dish.

The recipe I follow is:

Long Green chillies - 1 cup
Onions - 2 nos (Julienne)
Peanuts (Blanched) - 1/2 cup
Grated Fresh coconut - 1/4 cup
Sesame seeds - 1 tsp
Cumin seeds - 1 1/4 tsp
Coriander seeds - 1 1/2 tsp
Ginger- Garlic paste - 1 tsp
Turmeric powder - 1/4 tsp
mustard seeds - 1/4 tsp
curry leaves - few
Bay leaf - 2
Thick Tamarind extract - 1/4 cup
Fresh curds - 1/4 cup

Method:
1) Slit green chillies and de-seed them. If the chillies are very long, you could chop them up into bite size pieces.

2) In a frying pan, pour sufficient vegetable oil and fry them well. Drain any excess oil by placing a Tissue paper.

3) Prepare the Masala paste:
Start by dry roasting Sesame seeds, Coriander seeds, Cumin seeds, peanuts and coconut.
Pound everything together and keep aside.

3) Heat 2 tbsp of oil in a pan, add mustard seeds, allow to splutter, then curry leaves and bay leaf.
Then add onions and saute. until onions are light golden brown.
Add Turmeric powder and mix well.


4) Add the pounded masala and mix well.


5) Then add curds and allow to cook for about 7-8 mins

6) Pour in 1 1/2 cup of water and bring to boil


7) Simmer, add tamarind pulp and cover for about 8 mins.

8) Finally add the fried green chillies, salt and keep it on low heat for 5 mins.


Serve hot with Biryani or steamed rice!!!


Mom's Tomato Rasam

Posted by Sanchitha 0 comments


This is my mom’s recipe for the aromatic Tomato Rasam. 
A warm soup for the wintry afternoon or accompanied with steaming white rice...


You will need:
Good quality tamarind – lemon size ball (soak in warm water for about 10 mins and extract juice)

Toor dhal – 1/4 cup (pressure cooked in plenty of water. When done take the dhal seperately and mash well which forms a thick dhal paste and retain the dhal water seperately).

Ripe Tomatoes – 2 (cubed)

Green chillies – 1

Rasam powder – 1 tblsp

Curry leaves – 1 spring

salt, to taste

For Tempering:
Mustard seeds – 1 tsp
Ghee – 1 tsp
Asafoetida – a pinch

Method:
1. In a narrow neck pot, place the extracted tamarind water and crush the tomatoes well and add green chillies and curry leaves.

2.Place this on stove on medium heat and bring to boil.

3. When the raw smell of tamaring disappears, add 2 tablespoons of good quality rasam powder ans salt.

4. When it froths up, simmer for 2 mins and add the dhal paste first. Stir and let it boil for another 5 mins. Next add the dhal water and keep on low flame for 3-4 mins and remove from stove.

5. Crack mustard seeds in ghee, add asafoetida and pour over the Rasam.

6. Garnish with fresh coriander leaves and keep the pot closed for 5 mins and serve hot!

Phulka

Posted by Sanchitha Thursday, July 21, 2011 0 comments


Learning to make the perfect phulka is an art in itself. There are different methods of preparation of the dough but the one I have tried to formulate seems to be the best for me.
The end result depends very much on the flour you use and may vary from one brand to another.
I use freshly pounded whole wheat for preparing this and you may as well use other well known brands…

Here we go…
Whole wheat atta – 2 cups
salt – little
luke warm water – enough to knead into a dough
oil – 2 drops
Fresh yoghurt – 1 tbl.spn

Method:
1. Place the chapatti flour in a colander and add two drops of ghee to the flour. Mix it thoroughly with the dough.
2. Add salt, yoghurt and mix well with your finger tips.
3. Then add the luke warm water little by littleuntil it forms a soft pliable dough.
Do not add too much of water in the beginning, because it might become too moist. Hence water should be added in stages to see how much it really absorbs. The dough should not be sticky and your fingers need to feel dry. Please take care to get the right proportion and I agree it all goes by experience and practice.
4. Once your done with the dough, take a moist muslin cloth and wrap the dough and keep for about 10-15 mins.
5. Then , take medium lemon sized balls, pat in the flour and roll into thin chapattis.
A lot of people pat with too much of flour over the chapatti, which should be avoided. This would make the flour stick to the chapatti and would make it very dry.
To avoid this and to prevent the dough from sticking to the rolling board, you may throw some flour on the board rather on the chapatti. Never pat the flour directly on the chapatti.
6. Also when rolling, a circular motion needs to be maintained and this is really an art and when you move the rolling pin, the chapatti should rotate in a circle. This will ensure even thickness of the chapatti.
7. Also do it one at the time and never pile up the freshly rolled chapatti. This will allow the moisture to escape, which again will make it very dry.


8. When the tawa is slightly warm, place the chapatti on the pan. After 3-4 mins , small bubble tend to appear on its surface. Then turn and place on its other side. Nver use any kitchen equipment to press on the chapatti. You can use a soft cloth to press on it.


9. When the other side is also done, remove the pan and toss on the flame. You can also use a Iron grill on the stove.
The chapatti will puff as the picture below. Turn and place on the other side as well.


10. Apply little ghee and serve hot.

Mexican Rice

Posted by Sanchitha 0 comments


Last night I decided to make Mexican rice and would want to share with you. This is not the authentic Mexican recipe but the one I normally make because we prefer a bit of spices to add up to the flavour! But it really tastes yummy. You can use maybe white salsa as the accompaniant.


Mexican style Red Rice

To grind
Onions – 1
Tomatoes – 2 medium size
Garlic – 4-5 cloves

Other Ingredients:
Green peas – 4-5 tablespoons
Corn – 4 tablespoons
Microwave the green peas and corn.
Rice – Long Grain or Basmati (I use basmati because of the aroma) – 1 ½ cup
Soak the rice in enough water for about 15-20 mins.
Drain well and allow to dry and fry in 1-2 tsp of light olive oil or canola oil until toasty in medium flame.
½ tsp Mexican chilli powder – ½ tsp (or)
a mixture of paprika, cayenne, cumin, garlic powder and dried oregano
3 slit fresh Serrano or jalapeno chillies
Chopped parsley or Cilantro for garnishing
Oil for frying

Method:
Pour oil in a pan and when warm and fry the ground onion – tomato paste. Keep turning until the raw smell disappears and the oil separates from the paste.
Add Mexican chilli powder, salt and then peas and corn.
Transfer the gravy onto the rice, add water/stock, and place in the rice cooker or in a thick saucepan covered and slow cook until done.

Quick Brown rice with beans

Posted by Sanchitha Sunday, July 17, 2011 0 comments


The health benefits of eating brown rice is now spreading across the globe and a healthy portion of brown rice can give you enough fiber compared to the polished white rice which loses many of its nutrients in the process.

The health benefits of high fiber content foods are numerous, it reduces the possibility of heart diseases, helps avoid abrupt spikes in sugar levels, helps digestion and reduces constipation etc. Some medical tests have indicated that the health benefits of brown rice could include controlling high blood pressure. Besides high fiber content, brown rice also contains other nutrients like, B vitamins, manganese, selenium and iron. By eating brown rice, you will also get the health benefits that such nutrients give the human body. 

The recipe that follows is a simple brown rice recipe which can be had as a substitute to the regular white rice atleast 2 times a week.

Cooking Brown Rice.
The basic concept of cooking white rice applies when using brown rice but however it is advised to soak brown rice in water to soften its grains for atleast 25-30 mins.
The grains are a bit tough and stiff and does not mash.
The proportion can be 1:2 ratio ie., 2 cups of water for every 1 cup of brown rice.

You will need:
Brown rice: 1 cup
Onions - 2 (Julienne) 
Green Beans - 6-7 (cut into long pieces)
Tomato - 1 no (chopped)
Lemon juice - 2 tbsp
Coriander seeds for garnish
Crushed black peppercorns - few
Olive oil - little 
salt to taste

Method:
1) Cook Brown rice as explained above. Cool and spread on a plate.


2) In a wok, add olive oil, and saute the onions until crisp and brown. Next add green beans and the chopped tomatoes and allow to cook. Cover and simmer for above 5 mins.

3) Mix rice to the above, add crushed blackpeppercorns, lemon juice and salt to taste.

Finally garnish with chopped coriander leaves.

Coconut chutney

Posted by Sanchitha 0 comments


For this coconut chutney I used fresh red chilli for making the chutney extra hot and to give it a rich red texture to the chutney. You could also use green chillies if you prefer it to be medium hot.

All you need:
Long red chillies - 3-4
Grated fresh coconut - 3/4 cup
Channa dhal - 2 tbsp
sea salt - 1/2 tsp
Tamarind - a small lime size

Method:
Dry roast grated coconut, red chillies, gram dhal for about 4-5 mins. Do not turn the coconut brown.
Grind/pound to a coarse paste.
You can also add a touch of tempered mustard seeds on the top.


Serve with crispy dosas

Powered by Blogger.
Free Website templatesfreethemes4all.comLast NewsFree CMS TemplatesFree CSS TemplatesFree Soccer VideosFree Wordpress ThemesFree Web Templates